Preference Storage for DApps using Metamask with Next.js
Web3 applications such as DAOs and DApps are getting more and more popular. By the premises of Web3, these platforms are supposed to provide a more personal and customized experience for their users while keeping their identities private from others or even unknown to themselves.
In this project, we explore how we can enhance the user experience for such cases.
Authentication / Identity Check through Wallets
For many applications, blockchain wallets like Metamask are used to manage crypto assets such as ETH. Such wallets let users create accounts on different chains. These accounts are created with private keys; however, each account has a public address representing it.
Since public keys can be shown by anyone, but transactions related to them can only be managed by the owner, wallet connections provide a solid authentication mechanism for such applications.
The Project
In this project, we will implement a preference storage system using Next.js, where users can customize the interface provided to them. Meaning, whenever they come back to that site, they will see the UI as they intended.
Even more powerful ideas could involve normalizing user interfaces across companies' sub & cross-platforms. This way, whenever a user navigates to a certain site supporting the preferences they set on other sites, they will have a similar experience.
Also, this project can be modified to change the number of parameters for customization, allowing you to mold it into whatever structure you have in mind.
For this sample project, there are only two parameters, namely:
- Theme of the website
- Greeting name for the user
Getting Started
Configure Upstash Redis Environmental Variables
- Create a free Redis database at Upstash
- Copy the .env.local.example file to .env.local (which will be ignored by Git):
- UPSTASH_REDIS_REST_URL and UPSTASH_REDIS_REST_TOKEN can be found at the database details page in Upstash Console.
Dependencies
Install dependencies:
npm i @upstash/redis @metamask/detect-provider @mui/material @emotion/react @emotion/styled
Create api/store.js file
Configure Redis SDK and export the handler function.
import { Redis } from "@upstash/redis"
const redis = Redis.fromEnv()

export default async function handler(req, res) {
  const accountID = await JSON.parse(req.body).accountID
  const body = req.body
  const setResult = await redis.set(accountID, body);
  res.status(200).json({ result: setResult })
}
Create api/[accountAddress].js file
Similarly, configure Redis SDK and export the handler.
import { Redis } from "@upstash/redis"
const redis = Redis.fromEnv()

export default async function handler(req, res) {
    const accountID = req.query.accountAddress
    const getResult = await redis.get(accountID)
    res.status(200).json({ result: getResult })
}
Configure index.js file
Set your variables for the project
const [accountAddress, setAccountAddress] = useState(null)
const [themePreference, setThemePreference] = useState("light")
const [greetingMessage, setGreetingMessage] = useState("Anonymous Person")
const [userSettings, setUserSettings] = useState(null)

// Check if connection already established. If so, fetch the data.
useEffect(() => {
    checkConnection()
    getPreferences()
}, [accountAddress])
Connecting Metamask
async function connect() {
  const provider = await detectEthereumProvider();
  console.log("provider:", provider);

  if (provider) {
    console.log("Ethereum successfully detected!");
    provider
      .request({ method: "eth_requestAccounts" })
      .then((accounts) => {
        if (!accountAddress) {
          setAccountAddress(accounts[0]);
        }
      })
      .catch((err) => console.log(err));
    console.log("window.ethereum:", window.ethereum);
    getPreferences();
  } else {
    alert("Please install MetaMask!");
  }
}
Checking Connection when refreshed or navigated after some time
async function checkConnection() {
  const provider = await detectEthereumProvider();
  if (provider) {
    provider
      .request({ method: "eth_accounts" })
      .then((accounts) => {
        setAccountAddress(accounts[0]);
      })
      .catch(console.log);
  } else {
    console.log("Not connected, window.ethereum not found");
  }
}
To set preferences
async function setPreferences(themePreference, greetingMessage) {
  if (accountAddress) {
    const res = await fetch(`/api/store`, {
      method: "POST",
      body: JSON.stringify({
        accountID: accountAddress,
        themePreference: themePreference,
        greetingMessage: greetingMessage,
      }),
    });
    const data = await res.json();
  } else {
    alert("No account address detected");
  }
}
To get preferences
async function getPreferences(e) {
  if (accountAddress) {
    console.log("Fetching user preferences...");
    const res = await fetch(`/api/${accountAddress}`, { method: "GET" });
    const data = await res.json();

    setUserSettings(data.result);
    if (data.result) {
      setThemePreference(data.result.themePreference);
      setGreetingMessage(data.result.greetingMessage);
    }
  } else {
    console.log("No account connected yet!");
  }
}
Change state of Variables
Bind the following functions to input fields/buttons etc.
async function handleDarkMode(e) {
  console.log("themePreference:", themePreference);
  const newPreference = themePreference == "light" ? "dark" : "light";
  setThemePreference(newPreference);
  await setPreferences(newPreference, greetingMessage);
  await getPreferences();
}

async function takeGreetingMessage(e) {
  // submit with enter/return key
  if (e.keyCode == 13) {
    const message = e.target.value;
    setGreetingMessage(message);
    console.log(message);
    await setPreferences(themePreference, message);
    await getPreferences();
    e.target.value = "";
  }
}
Create a simple UI utilizing the above functions
Make sure you imported relevant Material-UI dependencies.
return (
  <div className={styles.container}>
    <h2>Web3 Preferences Holder</h2>
    <Button variant="contained" onClick={connect}>
      Connect Metamask
    </Button>
    <p>Lets you keep user preferences on cross-websites</p>
    <br />
    <p>For example, take a greeter message from user.</p>
    <TextField
      label="Call me..."
      variant="outlined"
      size="small"
      onKeyDown={takeGreetingMessage}
    />
    <br />
    <br />

    <Button
      onClick={handleDarkMode}
      variant="contained"
      size="small"
      style={{ backgroundColor: "#3D3B3B" }}
    >
      {" "}
      Switch Dark Mode{" "}
    </Button>

    <p>Sample Component/Page:</p>
    <Showcase userSettings={userSettings} />
  </div>
);
Create sampleComponent.jsx in a directory components
This is the main component representing your web interface, application, etc. This component will visualize how the system works and the main goal it provides. Here, parse the parameters however you like and create your sample interface.
In this instance, the project is configured as such:
import React, { useState } from "react";

import { grey, orange } from "@mui/material/colors";
import { createTheme, ThemeProvider } from "@mui/material/styles";

const lightTheme = createTheme({
  palette: {
    primary: {
      main: grey[400],
    },
  },
});

const darkTheme = createTheme({
  palette: {
    primary: {
      main: orange[400],
    },
  },
});

export default function Showcase(parameters) {
  const userSettings = parameters.userSettings;
  const [theme, setTheme] = useState("light");
  const [greetingMessage, setGreetingMessage] = useState("Anonymous Person");

  const items = [];
  if (userSettings) {
    const obj = userSettings[0];

    for (const key in userSettings) {
      items.push(
        <li key={key}>
          {" "}
          {key}: {userSettings[key]}{" "}
        </li>,
      );
    }

    if (userSettings["themePreference"] != theme) {
      setTheme(userSettings["themePreference"] == "light" ? "light" : "dark");
    }

    if (
      !greetingMessage ||
      userSettings["greetingMessage"] != greetingMessage
    ) {
      if (userSettings["greetingMessage"]) {
        setGreetingMessage(userSettings["greetingMessage"]);
      } else {
        setGreetingMessage("not the same message");
      }
    }
  }

  return (
    <div>
      <div
        style={{
          padding: 10,
          margin: 10,
          backgroundColor: theme == "light" ? "grey" : "orange",
          border: "solid",
          borderWidth: "30px",
          borderColor: theme == "light" ? "#B2B2B2" : "black",
        }}
      >
        <ThemeProvider theme={theme == "light" ? lightTheme : darkTheme}>
          <h2>Hi, {greetingMessage}!</h2>
          <p>User and their preferences:</p>
          {items}
        </ThemeProvider>
      </div>
    </div>
  );
}
Workflow
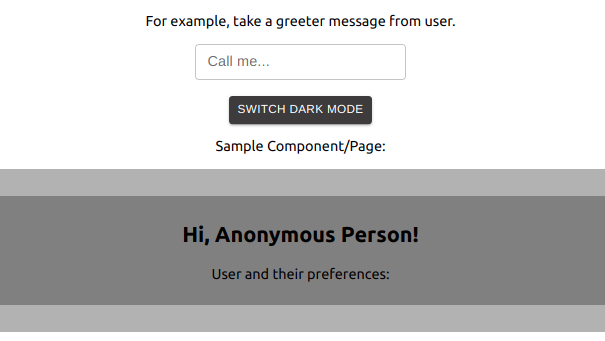
User not connected via Metamask yet. Default Template.

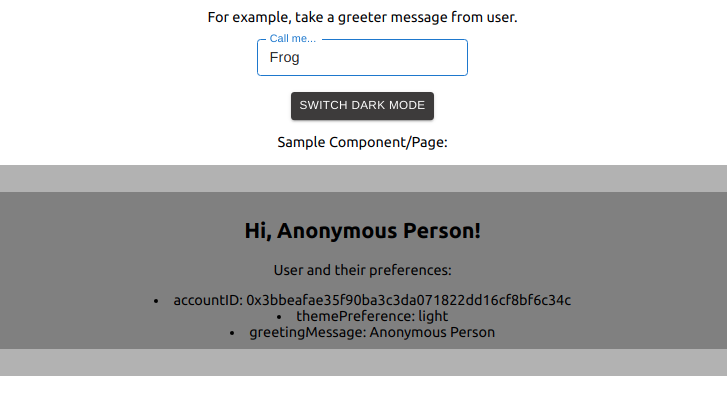
User connected via Metamask for the first time. Default Template.

- User enters a name that they want to see when greeted to platform.
- User selects between themes, namely light and dark.
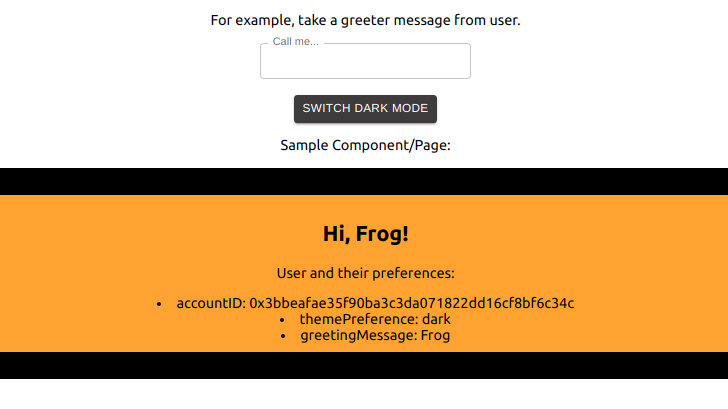
User preferences are set up. From now on, same interface can be shown in any platform supporting the preference interface provided. User-customized template.

The component shows the preferences set by the user in text format; you can parse them however you like.
As you can see in this simple example, you can parametrize any component that you show to the user. You can always add to this project by improving the design and increasing the number of parameters; however, the fundamental logic stays the same.
Final Words
To see a demo of the project, check here.
To see the finished project, go to Github Repo of the project.
There, you will see a quick deploy button for Vercel deployment; letting you deploy the project quickly, creating an Upstash Redis integration automatically.
We are looking forward to hearing your ideas and thoughts. You can reach us via twitter or discord.
