Getting started with Nuxt 3 and Serverless Redis
Introduction
If you ever had to build an app that tracks the application usage, restrict resources utilisation or fetch data from the cache to increase app performance, then you would know that Redis® is the answer to these requirements! Redis® is in-memory, key-value database. It is open source and it stands for Remote Dictionary Server.
In this article, we are going to discuss Upstash, Redis® database and the recent beta release of Vue SSR framework, Nuxt 3. This is a beginner friendly article that explores Redis® database, where we will build basic app that tracks page-visits of a Nuxt app.
Resources
- Github Repo: https://github.com/Krutie/upstash-nuxt-demo
- Demo
- Cloudflare worker: https://upstash-demo.krutie-patel.workers.dev/contact
- Netlify: https://thirsty-visvesvaraya-a09ab9.netlify.app/
What is Upstash?
Upstash is a service that provides serverless access to Redis® database. That's why it becomes essential for us to learn Redis® fundamentals that includes Redis® use cases and available commands to manipulate different types of data.
What is Redis?
Redis® has popular use cases such as:
- Caching data and session
- Leader-boards - rank names and scores in computer gaming or any software built with gamification principles
- Queues - schedule tasks to be processed later in the background
- Usage metering/counting - restrict resource utilisation, control resource distribution or just counting at scale to watch and analyse usage, such as e-commerce sites, social media, mobile apps, etc
- Content filtering - for example, filter content against the list of prohibited words
At basic level, Redis® database stores data in key-value pairs. But it can also store data in advanced data structures such as Lists, Sets, Sorted sets, etc. Redis® also provides set of commands to manipulate these data-structures. Since we will use one of them in our example app, it's worth taking a look at their high-level definitions.
- Lists - is more like a basic array. List allows you to push and pop items from both ends of a sequence, fetch individual items, and perform a variety of other operations. List commands are prefixed with letter L, i.e. LPOP, LPUSH, LSET, etc
- Hash - allows you to store groups of key-value pairs in a single Redis® key. Hash commands are prefixed with letter H, i.e. HSET, HGET, HDEL, etc
- Sets - are like lists, but Sets are unique and store items in an unordered list. That's why Sets are not sortable, but you can quickly add, remove, and determine whether an item is in the Set. Set commands are prefixed with letter S, i.e. SADD, SCARD, SISMEMBER, etc
- Sorted sets - are like sets, but Sorted sets allow sorting by scores that looks very much like key-value pair. We can also manipulate and sort this numeric scores. Sorted set commands are prefixed with letter Z, i,e, ZADD, ZINCRBY, ZSCORE, etc
You can learn more about other Redis® commands at https://redis.io/commands
Upstash setup
Follow the instructions to setup an account and database as per the docs @ /docs/
Before you jump onto creating Nuxt app, make sure that your Upstash account is ready. You should be able to create one database with free-tier.
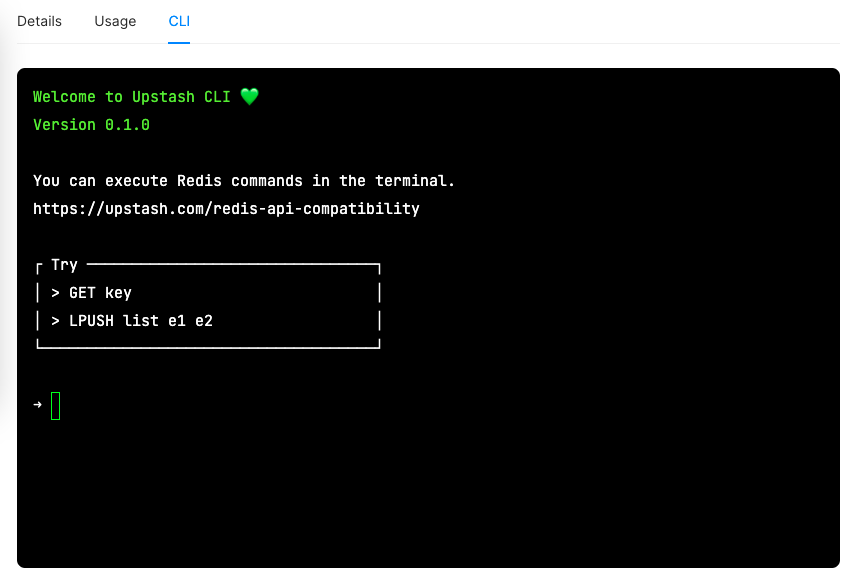
Once your database is created, you can create and access Redis® database using any Redis® client. Alternatively, you can use browser-based CLI👇 provided in Upstash console to get started immediately.

Browser-based CLI provided in Upstash console
Redis-cli
You can setup redis-cli on your machine terminal to create and access Redis® database directly from your command line interface.
Redis® npm packages
We also have several npm packages to interact with Redis® database. We will use 1) @upstash/redis and 2) ioredis - to access Redis commands in our Nuxt project.
In the next section, we will setup Nuxt project. Nuxt is an SSR framework build on top of Vue. Nuxt Labs has recently announced Nuxt 3 beta release. So, let's setup a fresh Nuxt 3 project.
Nuxt 3 is currently in beta, keep in mind that it is not yet production-ready.
⚡Let's talk about Nuxt 3
Nuxt 3 introduces a brand new CLI called nuxi to create Nuxt app.
npx nuxi init nuxt3-appWe will create /pages directory and add couple of simple routes as below👇
-pages;
--index.vue;
--about.vue;
app.vue;
app.vue is a new introduction to Nuxt 3 that acts as a main component. app.vue will be loaded for every routes defined in the /pages directory.
Nitro server engine ⚙️
Nuxt 3 also introduces a brand new server engine called Nitro. We can leverage the power of Nitro to create server API endpoints and server middleware by simply creating a server directory with api and middleware as sub-directories. You can review this minimalist directory structure in the Github repo.
-server;
--api;
--middleware;
Both API and middleware should export a default function that handles api requests and returns a promise/JSON data. Unlike Nuxt 2, we don't have to define server-middleware in nuxt.config.js.
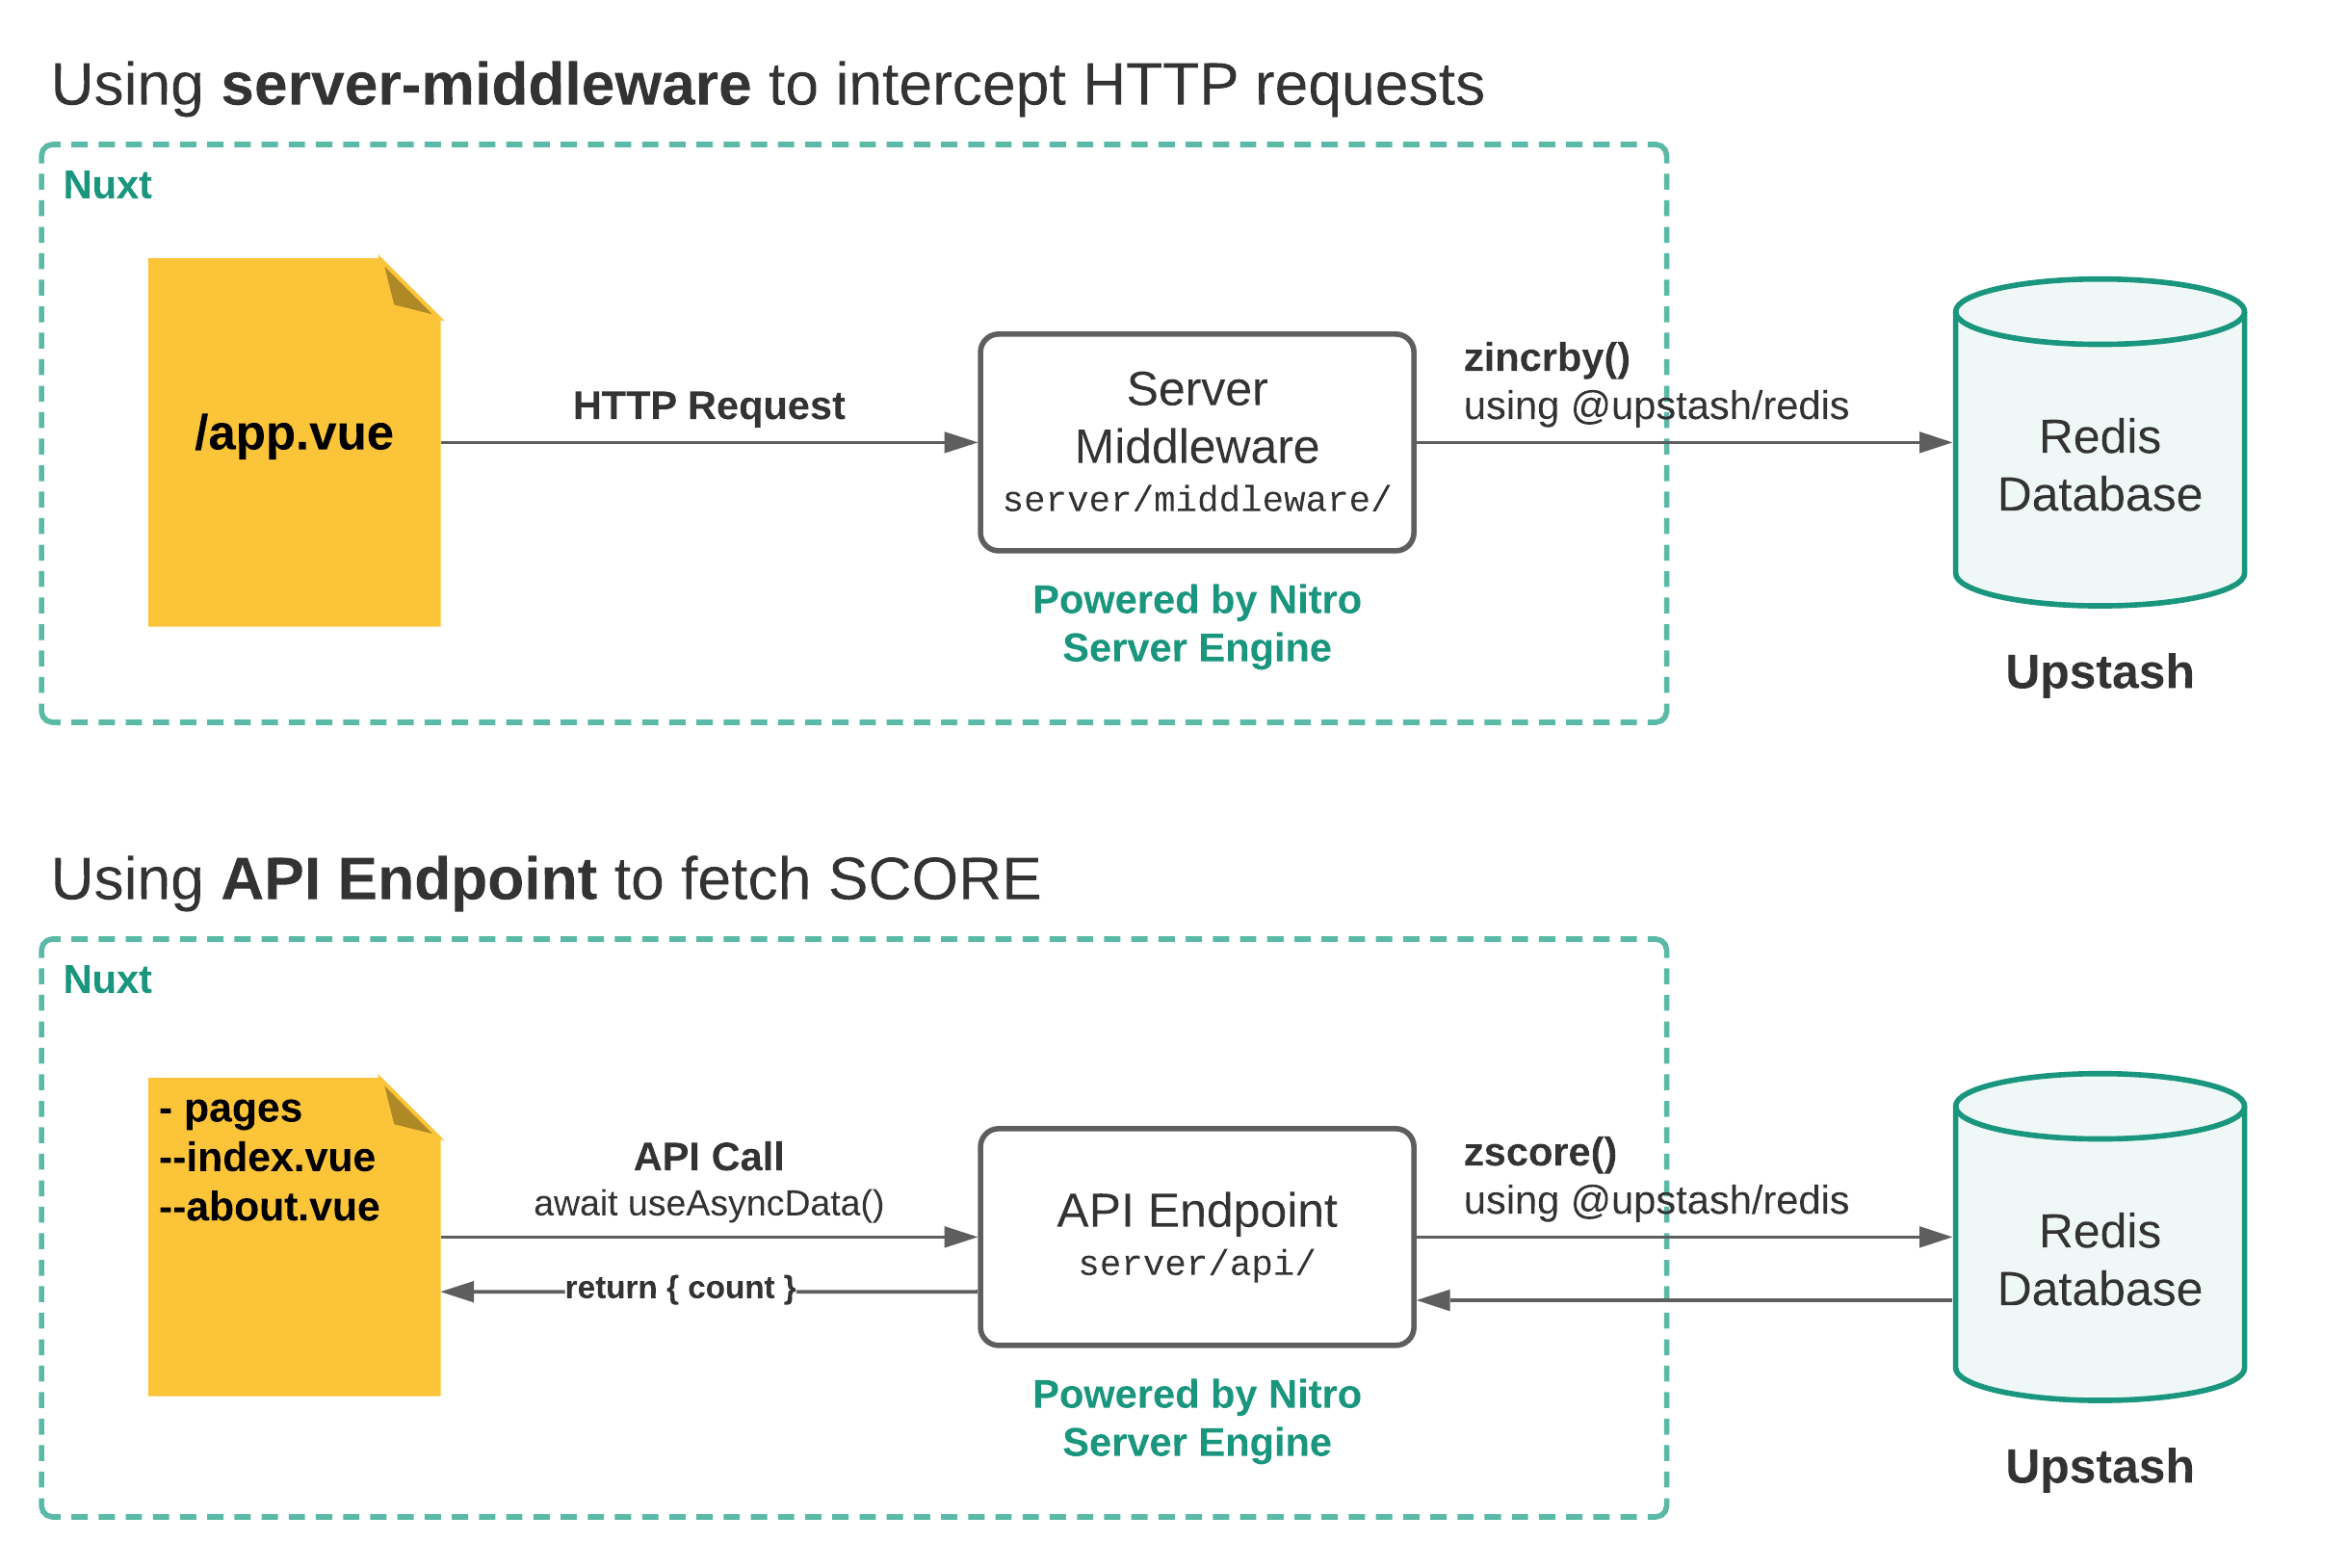
Here’s the high-level list of steps we need to take to build our app:
- First, we connect with the Redis database.
- To record page visits, we intercept every page requests made to the server, increase the counter of that page by one, and store its value into Redis database.
- Then, we make an API call from the client-side to retrieve the visit-count from the Redis database and display it on the Nuxt page.
Conceptually, the diagrams below shows what we are trying to build👇

Learn more about Nuxt 3 @ https://v3.nuxtjs.org/getting-started/installation
Use REST Redis Client
Upstash provides its own HTTP/REST based Redis client - @upstash/redis - that we can add as a dependency in our Nuxt project.
yarn add @upstash/redisAuthenticate Redis DB
To authenticate Redis database, we need to locate the following environment variables:
- REST URL (UPSTASH_REDIS_REST_URL), and
- Token (UPSTASH_REDIS_REST_TOKEN)
...from the Upstash console - under the database.
Private runtime config
Now, to expose these environment variables on the server-side, Nuxt provides runtime configuration that we define innuxt.config.js file.
// nuxt.config.js
export default defineNuxtConfig({
  publicRuntimeConfig: {},

  privateRunimeConfig: {
    UPSTASH_REDIS_REST_URL: process.env.UPSTASH_REDIS_REST_URL,
    UPSTASH_REDIS_REST_TOKEN: process.env.UPSTASH_REDIS_REST_TOKEN,
  },
});
Next, we can access these environment variables directly by importing #config.
import { Redis } from "@upstash/redis";
import config from "#config";

const redis = new Redis({
  url: config.UPSTASH_REDIS_REST_URL,
  token: config.UPSTASH_REDIS_REST_TOKEN,
});
As an alternate, a zero-config approach would be to add UPSTASH_REDIS_REST_URL and UPSTASH_REDIS_REST_TOKEN directly into the .env file and creating a redis instance const redis = Redis.fromEnv() without the need to pass these variables to Redis. Note that this magic is only applicable when using @upstash/redis Redis client.
Intercept request with Nuxt server-middleware
We are free to use any required Redis commands from here on. For this example, we will use sorted-set, since sorted-sets are unique and also allow sorting and manipulating of SCORE.
For example, we can use zincrby to increase the page SCORE every time the request is made to the page.
// server/middleware/pageCount.js
import { Redis } from "@upstash/redis";

import { getRedisKey } from "../utils";

const redis = Redis.fromEnv();

export default async function (req, res, next) {
  const redisKey = getRedisKey(req.url);
  await redis.zincrby("myPageCounts", 1, redisKey);
  next();
}
Generating namespace
Redis is NoSql database that stores data in key-value pairs. It doesn't have a concept of auto-incrementing keys or have any dynamic way to generate unique UUID of any kind. This is where we introduce getRedisKey() utility function.
This utility function processes the request URL and create unique key - that we will use to store visit-count against each page. This way we can prevent increasing our counter against the same key.
In our example, we pick up the request URL and replace all instances of '/' with '.' to generate unique name-spaced keys.
export const getRedisKey = (url: string) => {
  const reqURL = url?.replace("/", ".");
  const redisKey = reqURL === "." ? "page.home" : `page${reqURL}`;
  return redisKey;
};
This will help us convert, for example: /about page into a name-spaced key that will read as page.about
Access Redis DB using REST API Endpoints
Let's create an API endpoint that will fetch the current count or SCORE for respective pages.
In Nuxt 3, there are two ways to fetch data. 1)useAsyncData and 2) useFetch. In app.vue, we will use useAsyncData along with $fetch provided by ohmyfetch library.
// app.vue
<script setup>
	const router = useRoute();
  const { data: count } = await useAsyncData('Count', () => $fetch('/api/count', { params: { path: router.path}}))
</script>
As you can see, along with the API call, we have passed the router path as a query parameter to identify the page that's being accessed👇
$fetch("/api/count", { params: { path: router.path } });Unlike server-middleware, we will have to consume this API endpoint, /api/count to fetch the visit count. That brings us to the fun part!
Let's create this API endpoint at server/api/count.ts. We will make use of useQuery method provided by h3 library to access the query parameter sent from the client-side.
// server/api/count.ts
import { useQuery } from "h3";

export default async (req, res) => {
  let query = await useQuery(req);
  const redisKey = getRedisKey(query.path);
};
Here 👆 we will use the same getRedisKey() utility to make sure this key matches with a name-spaced key we used in the middleware to increase the count of the page.
So, now we can pass this key into zscore that we are sure it exists in the database to fetch the SCORE/count. 👇
// server/api/count.ts
// ...
import { Redis } from "@upstash/redis";

const redis = Redis.fromEnv();

export default async () => {
  // ...
  const count = await redis.zscore("myPageCounts", redisKey);
  return { count };
};
Use Redis API directly with ioredis
We can achieve the same using ioredis library as well.
yarn add ioredisWhile using ioredis, we won't have an auth method available. However, we do have a connection string - available in Upstash console - that we can use to connect with Redis database.
We can set UPSTASH_REDIS_CONN as a runtime configuration variable similarly as we did earlier for the rest-url and token.
// nuxt.config.js
export default defineNuxtConfig({
  publicRuntimeConfig: {},

  privateRunimeConfig: {
    UPSTASH_REDIS_CONN: process.env.UPSTASH_REDIS_CONN,
  },
});
Next, in the middleware, we will create new Redis() instance to create a connection and access all Redis commands from the client👇
// server/middleware/pageCount.js

import config from "#config";
import Redis from "ioredis";

const client = new Redis(config.UPSTASH_REDIS_CONN);
Intercept request with Nuxt server-middleware
Our Nuxt middleware will remain the same as before, except for how we access the zincrby will change👇
// server/middleware/pageCount.js
// ...
export default async function (req, res, next) {
  // ...
  await client.zincrby("myPageCounts", 1, redisKey);
  next();
}
Access Redis DB using REST API Endpoints
Earlier, we create custom API endpoint server/api/count.ts to get the count. That API endpoint will also remain the same, except for how we call zscore method will change a little👇
// server/api/count.ts
import config from "#config";
import Redis from "ioredis";

const client = new Redis(config.UPSTASH_REDIS_CONN);

export default async (req: IncomingMessage, res: ServerResponse) => {
  // ...
  const count = await client.zscore("myPageCounts", redisKey);
  return { count };
};
Test with Upstash CLI
Since we are storing all the data into sorted-set, we can use zrange to fetch all items from our sorted-set.
You can access the Redis CLI provided in Upstash console and run the following command:
zrange myPageCounts 0 -1Here👆:
myPageCountsis the name of our sorted-set,0 -1signifies the range, where0is the starting value and-1represents the last item of the set.
Above command lists all the keys without their SCORES. We can fix that by adding WITHSCORES 👇
// lowest SCORE first
zrange myPageCounts 0 -1 WITHSCORES

// highest SCORE first
zrevrange myPageCounts 0 -1 WITHSCORES

// get SCORE for page.home hits
zscore myPageCounts page.home
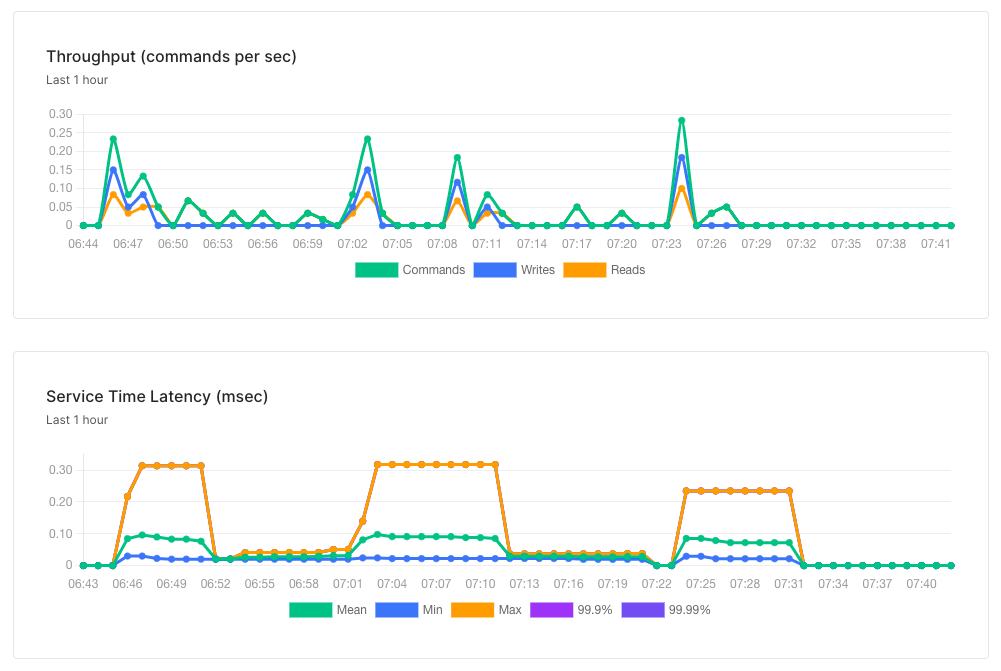
While you test your APIs and middleware, make sure to check the Upstash console for all the activities taking place on your website.

Resource usage in Upstash console
Deploying your Nuxt 3 app
Nitro server engine plays an important part while deploying Nuxt 3 app.
Netlify
To deploy on Netlify, we would push the GitHub repo of our Nuxt app as we normally do. Make sure you take care of the following three items to make sure your deployment goes smoothly.
- In Netlify, use
npm run buildas your build command, anddistas the directory to publish. - Create your environment variables for rest-url, token or Redis connection in Netlify before deploying.
- Last but not least, make sure you have created
netlify.tomlin the root of your Nuxt project. As in for the contents of this file, visit netlify.toml.
When we yarn build, Nuxt 3 creates a directory called .output that we have used in our .toml file to provide the path for our functions.
// netlify.toml
//...
[build];
// ...
functions = ".output/server";
Here's the Nuxt example from this article running on Netlify: https://thirsty-visvesvaraya-a09ab9.netlify.app/
Cloudflare
We can deploy our Nuxt 3 app on Cloudflare worker right from the terminal! Nuxt 3 docs recommends Miniflare to test your app locally and then use Wrangler to preview and publish it.
Make sure to add wrangler.toml file in the project root with your Cloudflare account_id and environment variables as shown in this example file.
For Cloudflare deployment, we will provide entry-point and build command with NITRO_PRESET=cloudflare.
// wrangler.toml
//..
[site]
bucket = ".output/public"
entry-point = ".output"

[build]
command = "NITRO_PRESET=cloudflare yarn nuxt build"
upload.format = "service-worker"
Here's the Nuxt example from this article running on Cloudflare worker: https://upstash-demo.krutie-patel.workers.dev/contact
Conclusion
We have covered the most basic application of Redis using Upstash services to see how can we integrate it with server-side rendering framework like Nuxt (v3) to:
- connect with Redis database,
- create unique keys and write the key-value pairs to the database,
- read data from the Redis database and
- deploy our app to Netlify and Cloudflare workers.
Upstash also provides an option to encrypt the data traffic for each database we create, along with an option to replicate data in multiple availability zones and to cache our REST API responses on globally distributed edge locations. You can find these options in Upstash console, under the details tab of your database.
As for any beginners wanting to explore Redis DB, Upstash makes it pretty easy to get started in terms of working with upcoming and existing front-end technologies we already know and love. I hope this article gives you a good starting point to begin your Redis journey.
