AI Powered Text Generator using Next.js, Replicate and Redis®
With AI becoming more accessible, companies like Replicate have made it easier to integrate machine learning models into projects seamlessly.
In this article, I'm going to discuss how I built CaptionAI, a web application that allows users to upload an image and receive an AI generated text caption. I built this project using this Vercel template. There is also this video explaining how this project was built.

What we'll be using
- Next.js 13 (Front-end and Back-end)
- Upstash Redis (Rate Limiting)
- Replicate (Machine Learning API)
- Tailwind CSS (Styling)
- Vercel (Deployment)
What you'll need
Setting up Upstash Redis
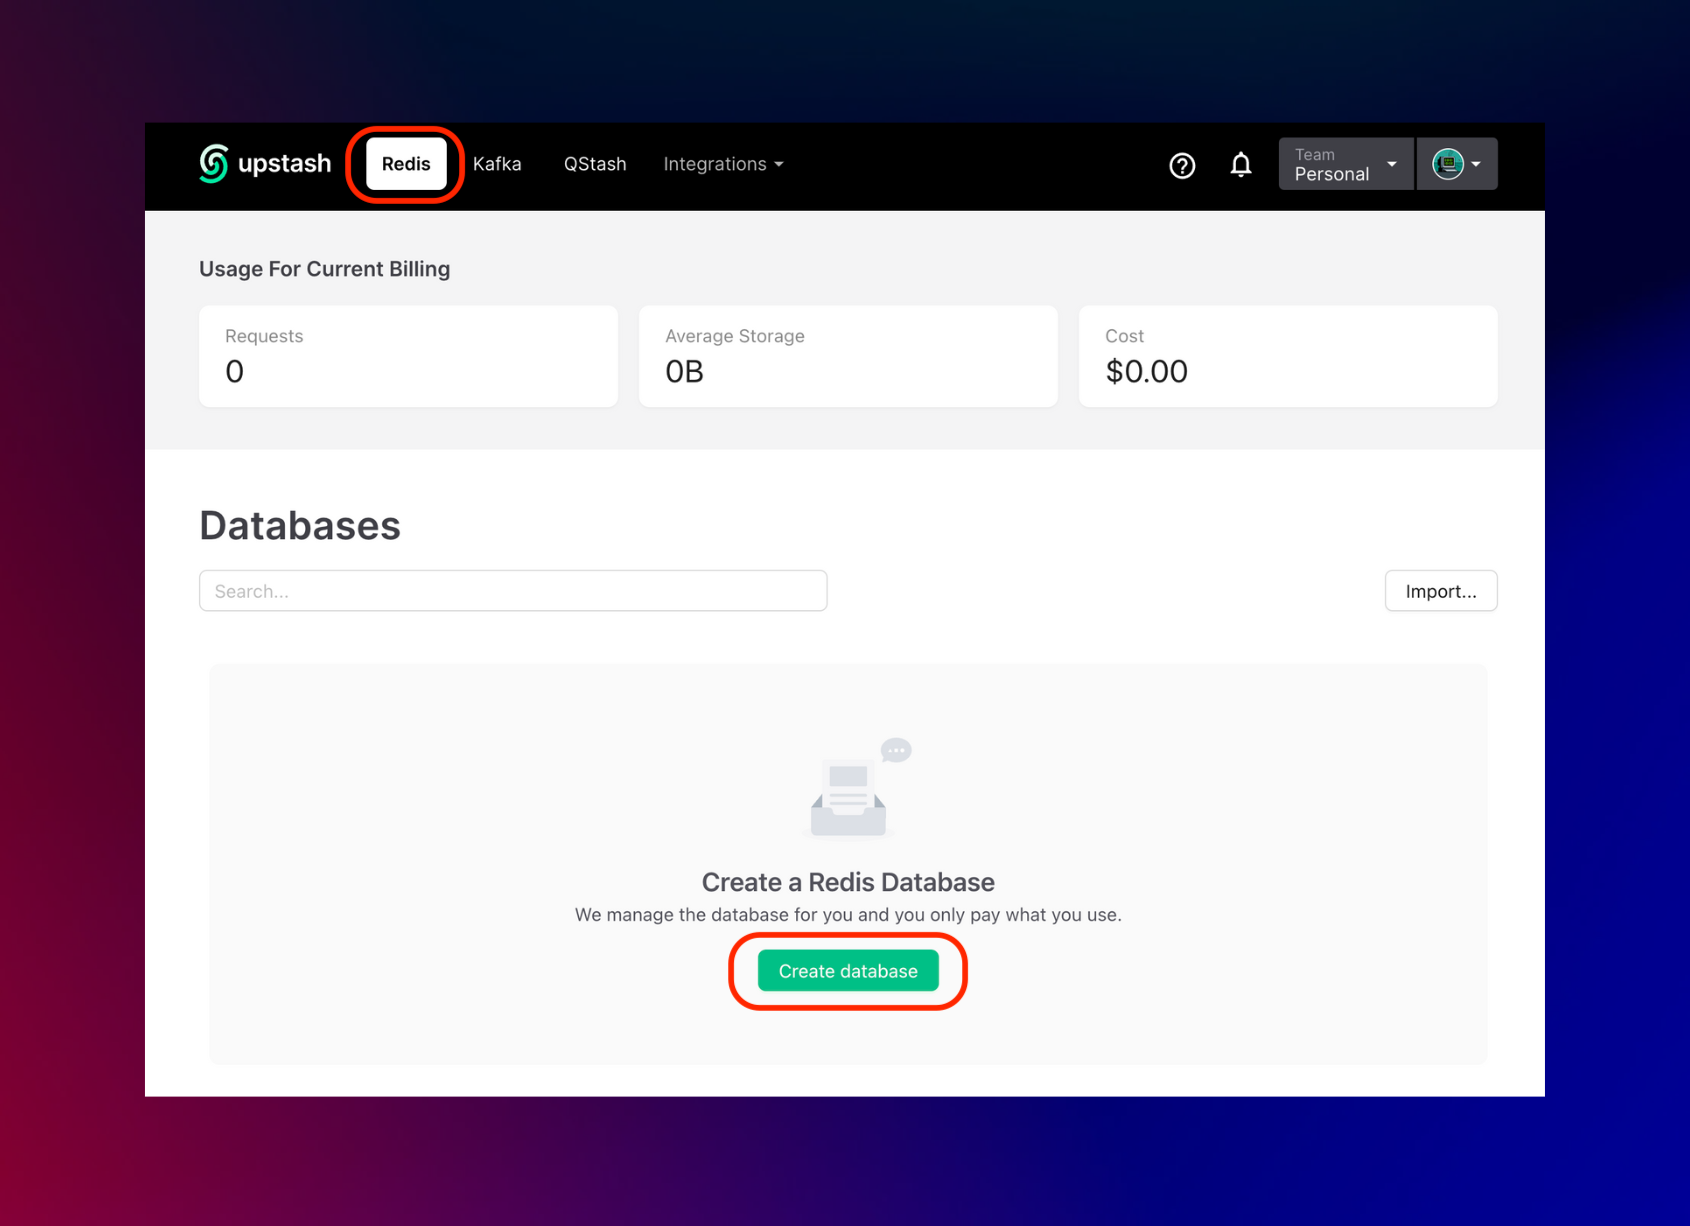
Once you have created an Upstash account and are logged in you are going to go to the Redis tab and create a database.
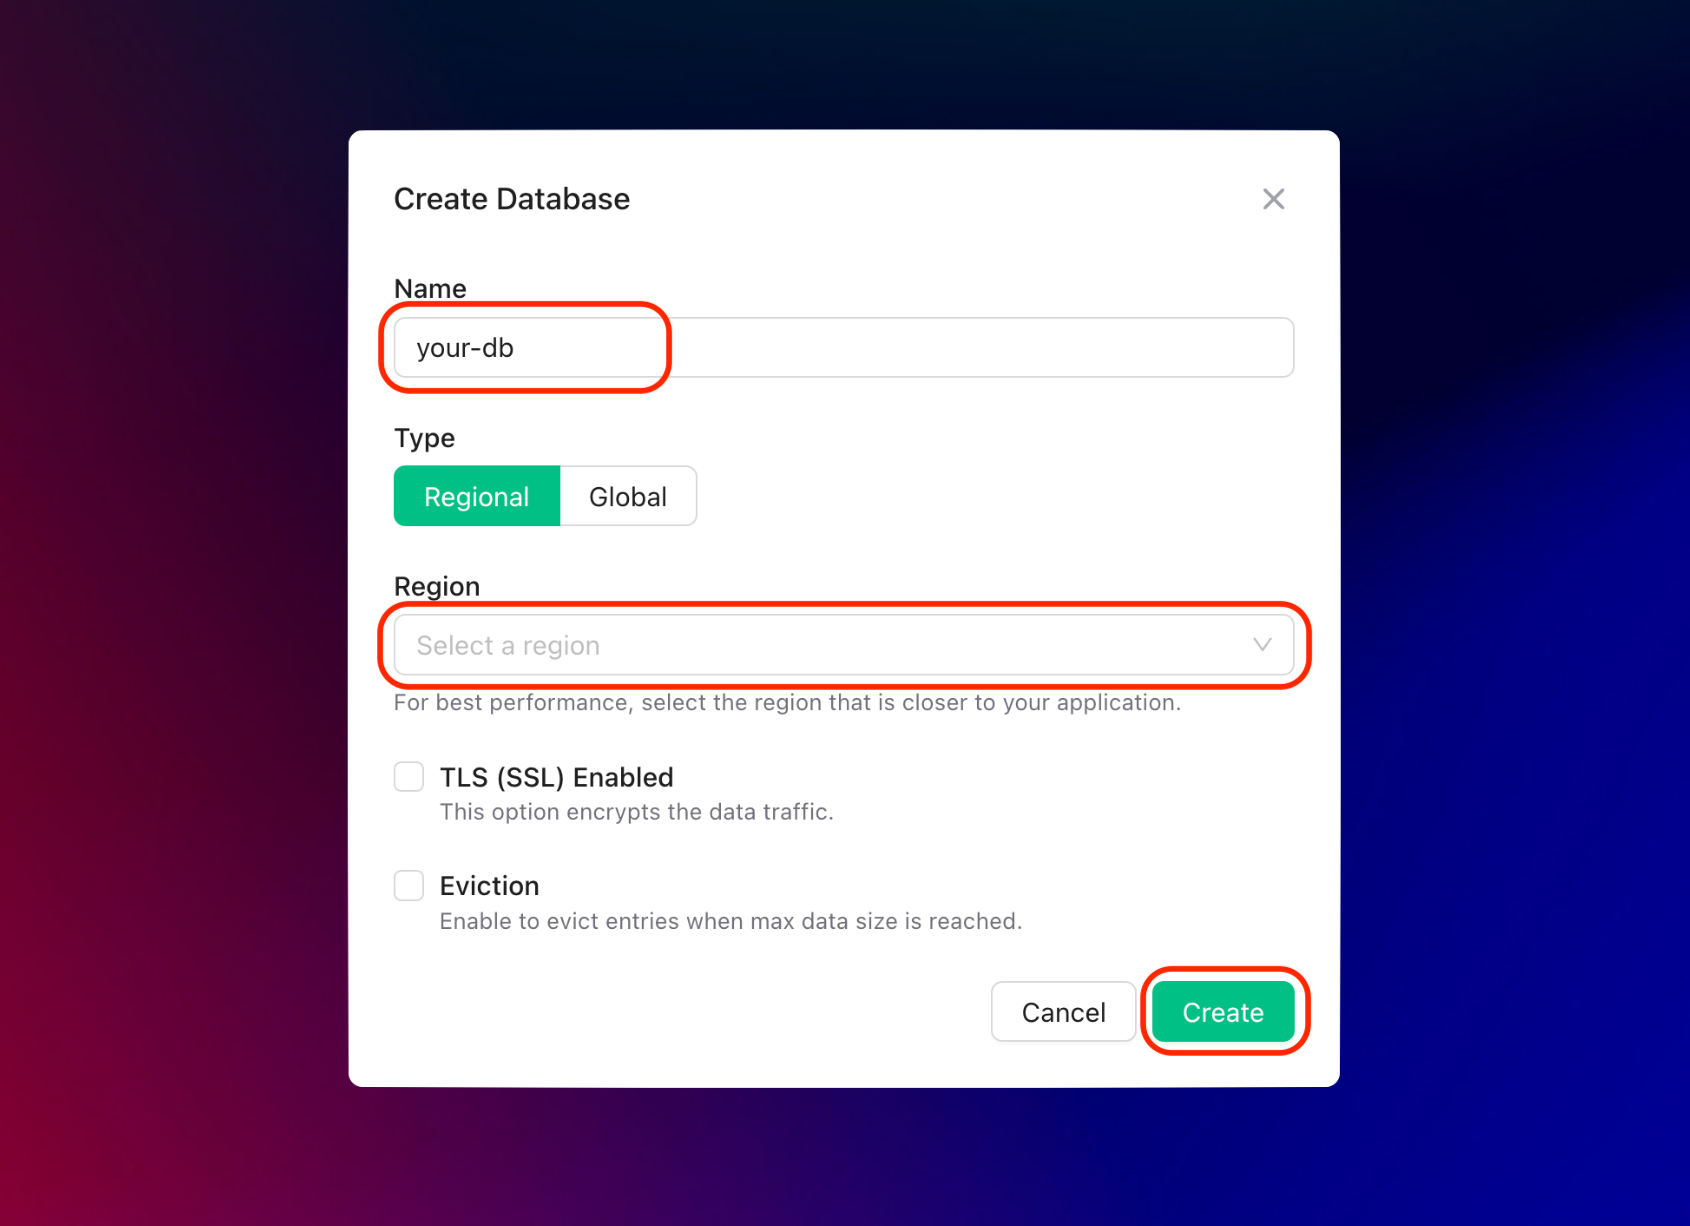
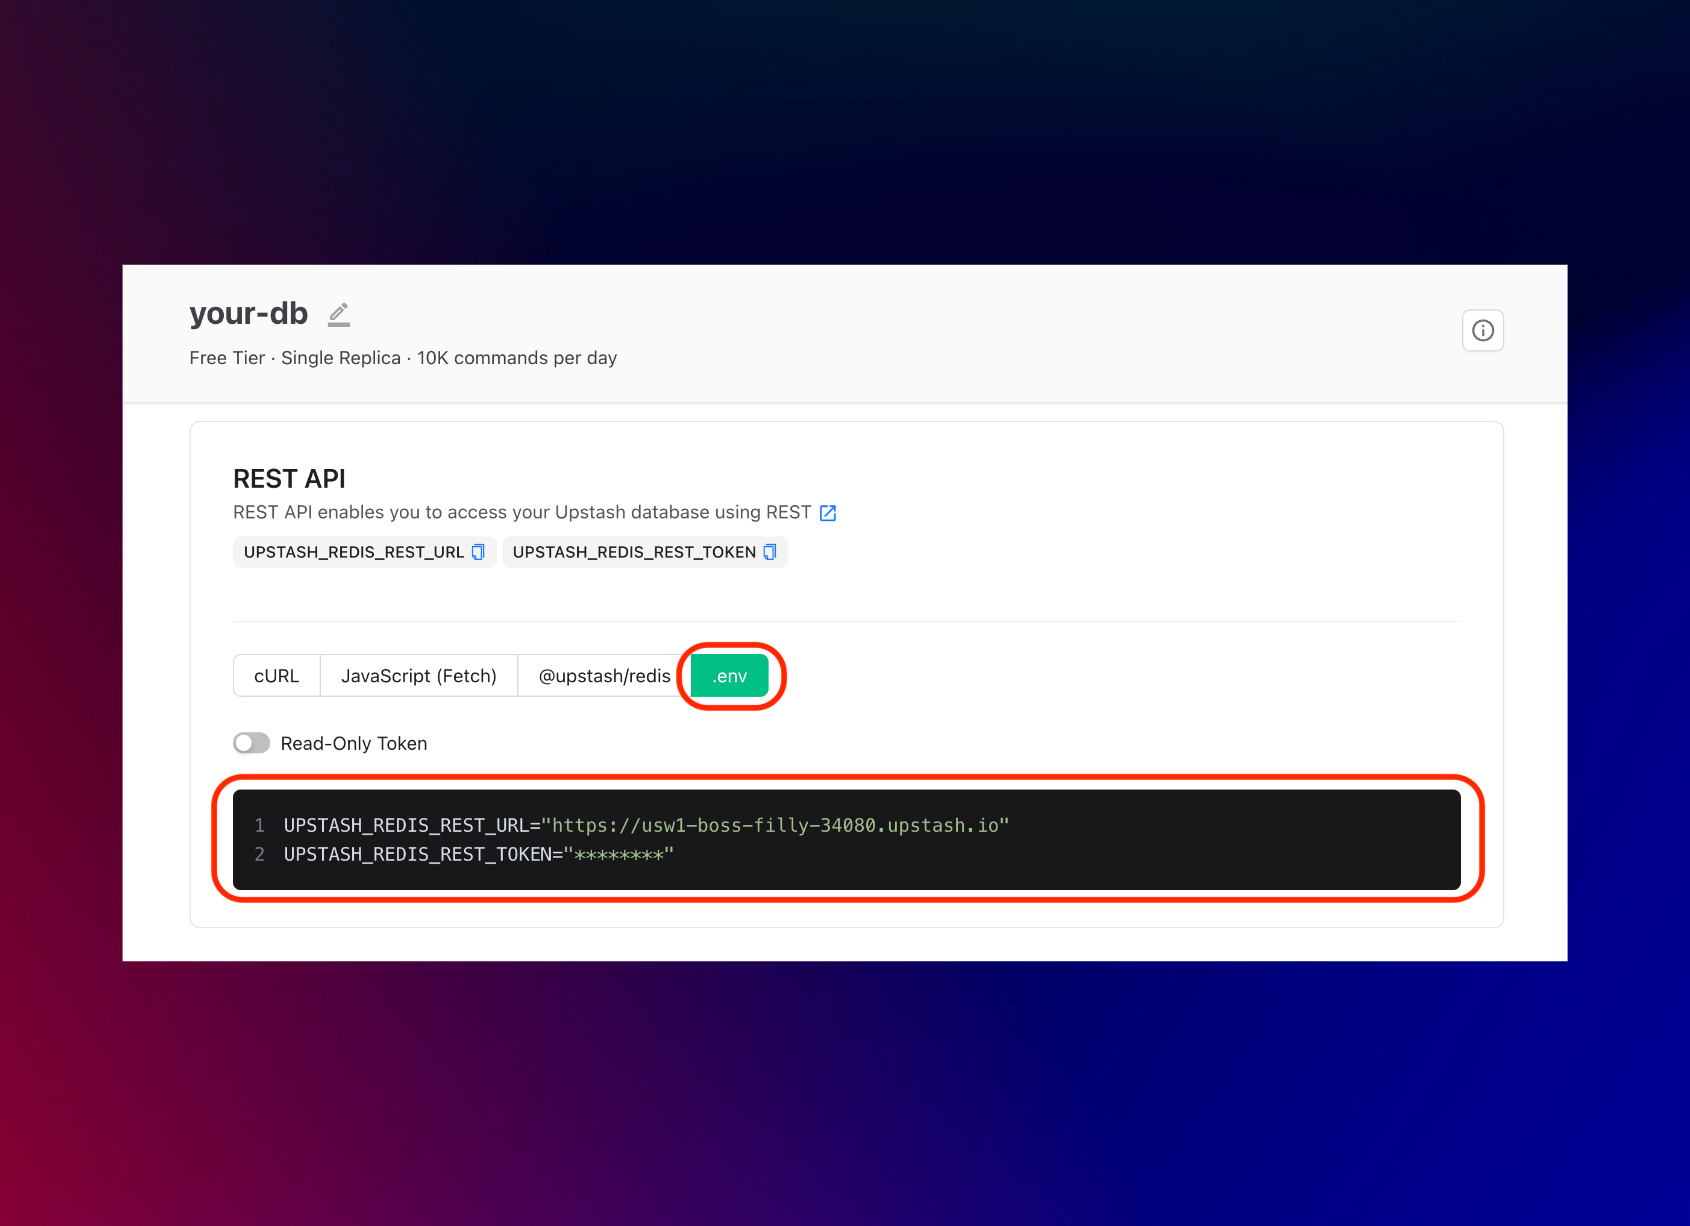
After you have created your database, you are then going to the Details tab. Scroll down until you find the REST API section and select the .env button. Copy the content and save it somewhere safe.
Setting up Replicate
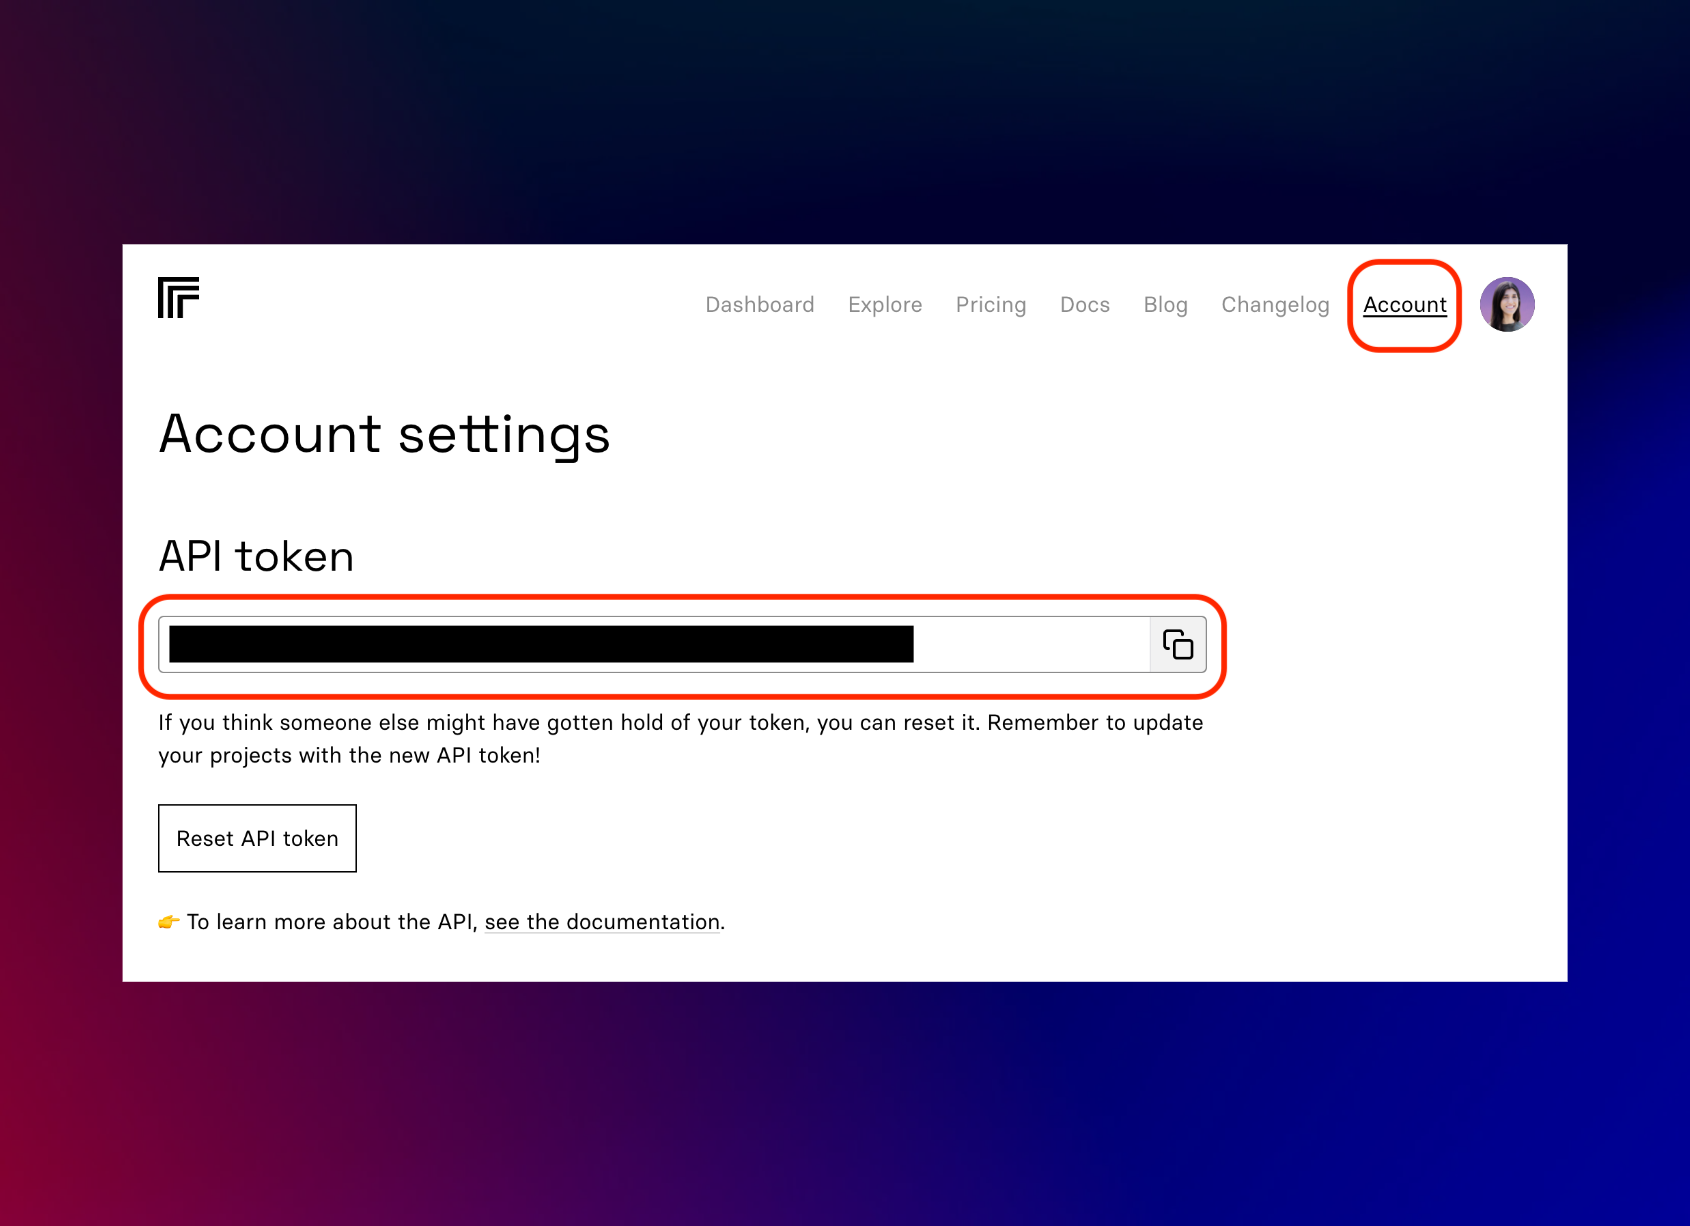
Once you have created a Replicate account and are logged in, you are going to go to the Account tab and save the API token somewhere safe.
*Note: You can use Replicate for free, but after a bit you'll be asked to enter your credit card. The price varies depending on the model you use. The model we are using, salesforce/blip, costs approximately $0.00042 to run.
Setting up the project
Rather than creating a project from scratch, you can clone the repository from GitHub.
Once you have cloned the repo, you are going to create a .env file. Copy the information from the .example.env file into the .env file. Once you have that copied, you are going to add the items we saved from the above sections.
It should look something like this:
// .env

REPLICATE_API_KEY="your_replicate_api_key_from_above"

// Optional, if you're doing rate limiting
UPSTASH_REDIS_REST_URL="your_upstash_redis_rest__url_from_above"
UPSTASH_REDIS_REST_TOKEN="your_upstash_redis_rest__token_from_above"
Once you have included this information you should be able to run the project by entering these commands into a terminal:
npm installnpm run devRepository Structure
This is the main folder structure for the project. I have circled in red the files that will be discussed further in this post that deals with uploading images, rate limiting and implementing the BLIP ML API.

High-Level Data Flow
This is a high-level diagram of how data is flowing. Our input, the user-uploaded image, goes through the Upload Component, to the backend for BLIP ML API processing and then displays the response text in the UI.

Create Redis instance
Inside the project, we are going to set up our upstash redis client that we can reference throughout the project when necessary.
// `/utils/redis.ts`

import { Redis } from "@upstash/redis";

const redis =
  !!process.env.UPSTASH_REDIS_REST_URL && !!process.env.UPSTASH_REDIS_REST_TOKEN
    ? new Redis({
        url: process.env.UPSTASH_REDIS_REST_URL,
        token: process.env.UPSTASH_REDIS_REST_TOKEN,
      })
    : undefined;

export default redis;
This code snippet imports the Redis module from the "@upstash/redis" package and creates a new Redis instance. The instance is created conditionally based on the presence of two environment variables, UPSTASH_REDIS_REST_URL and UPSTASH_REDIS_REST_TOKEN.
If both variables are defined, a new Redis instance is created with the specified URL and token. If either or both of the variables are undefined, the redis variable is set to undefined. Finally, the redis variable is exported from the module for use in other parts of the application.
Uploading an Image
// `/pages/captions.tsx`

const uploader = Uploader({
  apiKey: !!process.env.NEXT_PUBLIC_UPLOAD_API_KEY
    ? process.env.NEXT_PUBLIC_UPLOAD_API_KEY
    : "free",
});

const options = {
  maxFileCount: 1,
  mimeTypes: ["image/jpeg", "image/png", "image/jpg"],
  editor: { images: { crop: false } },
  styles: {
    colors: {
      primary: "#5a5cd1", // Primary buttons & links
      error: "#d23f4d", // Error messages
      shade100: "#fff", // Standard text
      shade200: "#fffe", // Secondary button text
      shade300: "#fffd", // Secondary button text (hover)
      shade400: "#fffc", // Welcome text
      shade500: "#fff9", // Modal close button
      shade600: "#fff7", // Border
      shade700: "#fff2", // Progress indicator background
      shade800: "#fff1", // File item background
      shade900: "#ffff", // Various (draggable crop buttons, etc.)
    },
  },
  onValidate: async (file: File): Promise<undefined | string> => {
    let isSafe = false;
    try {
      isSafe = await NSFWPredictor.isSafeImg(file);
      if (!isSafe) va.track("NSFW Image blocked");
    } catch (error) {
      console.error("NSFW predictor threw an error", error);
    }
    return isSafe
      ? undefined
      : "Detected a NSFW image which is not allowed. If this was a mistake, please contact me at hosna.qasmei@gmail.com";
  },
};
This code sets the configuration options for an uploader component. The uploader is created using the Uploader() function and the options are passed as an object to it.
The first configuration option is the apiKey which is used to authenticate with the uploader service. The value of apiKey is determined based on whether the environment variable NEXT_PUBLIC_UPLOAD_API_KEY is set. If it is set, the value of the environment variable is used, otherwise, the value "free" is used.
The options object contains various options for the uploader. These include:
- maxFileCount: Sets the maximum number of files that can be uploaded at once to 1.
- mimeTypes: Sets the allowed MIME types for uploaded files to "image/jpeg", "image/png", and "image/jpg".
- editor: Configures options for the image editor, which is disabled in this case by setting crop to false.
- styles: Defines custom styles for the uploader UI.
- onValidate: Defines a function that is called to validate each file before it is uploaded. In this case, the function uses a NSFWPredictor to check if the image is safe for work. If the image is not safe, an error message is returned indicating that the image is not allowed.
// `/pages/captions.tsx` continued

const Home: NextPage = () => {
  const [originalPhoto, setOriginalPhoto] = useState<string | null>(null);
  const [caption, setCaption] = useState<string | null>(null);
  const [buttonText, setButtonText] = useState("Copy");
  const [loading, setLoading] = useState<boolean>(false);
  const [error, setError] = useState<string | null>(null);

  const copyToClipboard = () => {
    navigator.clipboard.writeText(caption!);

    setButtonText("Copied!"); // set the button text to "Copied!" when text is copied
    setTimeout(() => {
      setButtonText("Copy"); // set the button text back to "Copy" after 2 seconds
    }, 2000);
  };

  const UploadDropZone = () => (
    <UploadDropzone
      uploader={uploader}
      options={options}
      onUpdate={(file) => {
        if (file.length !== 0) {
          setOriginalPhoto(file[0].fileUrl.replace("raw", "thumbnail"));
          generateCaption(file[0].fileUrl.replace("raw", "thumbnail"));
        }
      }}
      width="670px"
      height="250px"
    />
  );

  async function generateCaption( fileUrl: string )
  {
    await new Promise((resolve) => setTimeout(resolve, 500));
    setLoading(true);
    const res = await fetch("/api/generate", {
      method: "POST",
      headers: {
        "Content-Type": "application/json",
      },
      body: JSON.stringify({ imageUrl: fileUrl }),
    });

    let newCaption = await res.json();
    if (res.status !== 200) {
      setError(newCaption);
    } else {
      setCaption(newCaption);
    }
    setLoading(false);
  }

  ...
There are several state variables defined with the useState hook.
originalPhotois a string that represents the URL of the uploaded image.captionis a string that contains the generated caption for the uploaded image.buttonTextis a string that represents the text on the copy button.loadingis a boolean that indicates whether the component is currently fetching data.erroris a string that contains the error message if there is an error during the caption generation process.
The component has a function called copyToClipboard, which uses the navigator.clipboard.writeText method to copy the caption variable to the clipboard. When the text is copied, it changes the buttonText variable to "Copied!" for two seconds before resetting to "Copy".
There is also a sub-component called UploadDropZone that renders an instance of the UploadDropzone component with the specified uploader and options. The onUpdate callback is used to update the originalPhoto and caption variables with the URL of the uploaded image and the generated caption.
Finally, there is an asynchronous function named generateCaption that takes in a fileUrl parameter, which is the URL of the uploaded image. It uses fetch to call the /api/generate endpoint with a POST request and passes in the fileUrl as a JSON payload. The response is then parsed as JSON and either sets the caption or error variable, depending on whether the response was successful. The loading variable is also updated to indicate whether the request is still in progress. The function also includes a 500ms delay using the setTimeout function to avoid hitting API rate limits.
Rate Limiting
// `/pages/api/generate.ts`

import redis from "../../utils/redis";
import requestIp from "request-ip";

import { Ratelimit } from "@upstash/ratelimit";
import type { NextApiRequest, NextApiResponse } from "next";

type Data = string;
interface ExtendedNextApiRequest extends NextApiRequest {
  body: {
    imageUrl: string;
  };
}

// Create a new ratelimiter, that allows 3 requests every 15 minutes
const ratelimit = redis
  ? new Ratelimit({
      redis: redis,
      limiter: Ratelimit.fixedWindow(5, "1440 m"),
      analytics: true,
    })
  : undefined;

  ...
This code imports the necessary modules and types for creating an API endpoint in Next.js, as well as a Upstash Redis database client and a rate limiter library called "@upstash/ratelimit".
The ratelimit constant creates a new instance of the Ratelimit class, which creates a fixed-window rate limiter that allows 5 requests every 1440 minutes (24 hours). The redis property is passed as a parameter to the Ratelimit constructor to enable rate limiting across multiple instances of the application. If redis is undefined (e.g., if the Redis database is not configured), ratelimit is also set to undefined. This means that rate limiting will not be applied if Redis is not available.
// `/pages/api/generate.ts` continued

export default async function handler(
  req: ExtendedNextApiRequest,
  res: NextApiResponse<Data>
) {
  // Rate Limiter Code
  if (ratelimit) {
    const identifier = requestIp.getClientIp(req);
    const result = await ratelimit.limit(identifier!);
    res.setHeader("X-RateLimit-Limit", result.limit);
    res.setHeader("X-RateLimit-Remaining", result.remaining);

    if (!result.success) {
      res
        .status(429)
        .json("Too many uploads in 1 day. Please try again after 24 hours.");
      return;
    }
  }

  ...
This code block is part of an API handler function that limits the rate of requests a client can make to the API. It first checks if a rate limiter instance is available and if so, extracts the client's IP address using the request-ip package and passes it to the ratelimit.limit method. This method returns an object containing the number of requests remaining within the specified time frame and whether the request was successful or not.
If the request is successful, the X-RateLimit-Limit and X-RateLimit-Remaining headers are set in the response. If the request limit has been exceeded, a 429 status code and an error message are sent in the response, and the function returns early to prevent further execution.
BLIP ML API
// `/pages/api/generate.ts` continued

 const imageUrl = req.body.imageUrl;
 let startResponse = await fetch("https://api.replicate.com/v1/predictions", {
   method: "POST",
   headers: {
     "Content-Type": "application/json",
     Authorization: "Token " + process.env.REPLICATE_API_KEY,
   },
   body: JSON.stringify({
     version:
       "2e1dddc8621f72155f24cf2e0adbde548458d3cab9f00c0139eea840d0ac4746",
     input: {
       image: imageUrl,
       task: "image_captioning",
     },
   }),
 });

 ...
This part of the code takes the imageUrl from the request body and sends a POST request to the "https://api.replicate.com/v1/predictions" endpoint to get the image caption using the image_captioning task. The request includes the Authorization header that contains the Replicate API key for authentication, and the Content-Type header is set to "application/json". The response from the API is parsed as JSON, and the endpointUrl is extracted from the jsonStartResponse object.
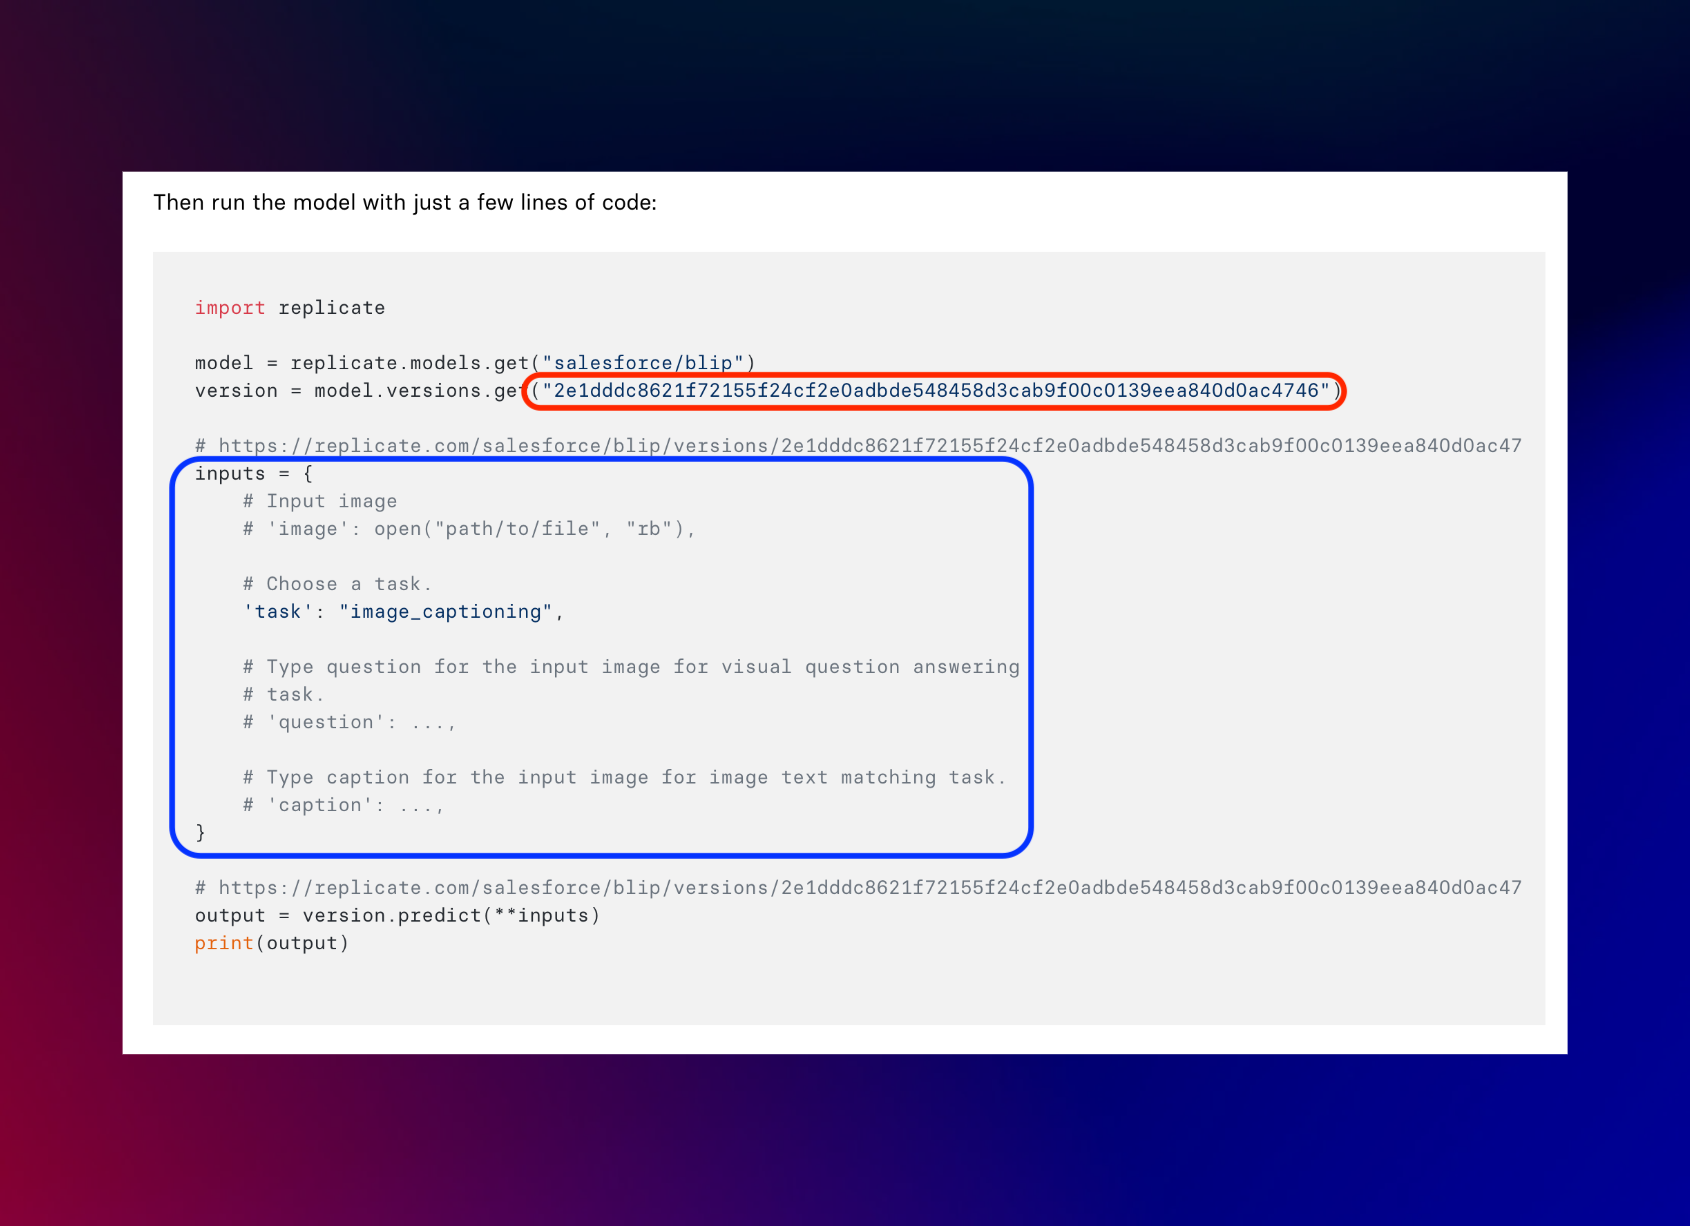
You can find the version number of the model by selecting the model you want to use.
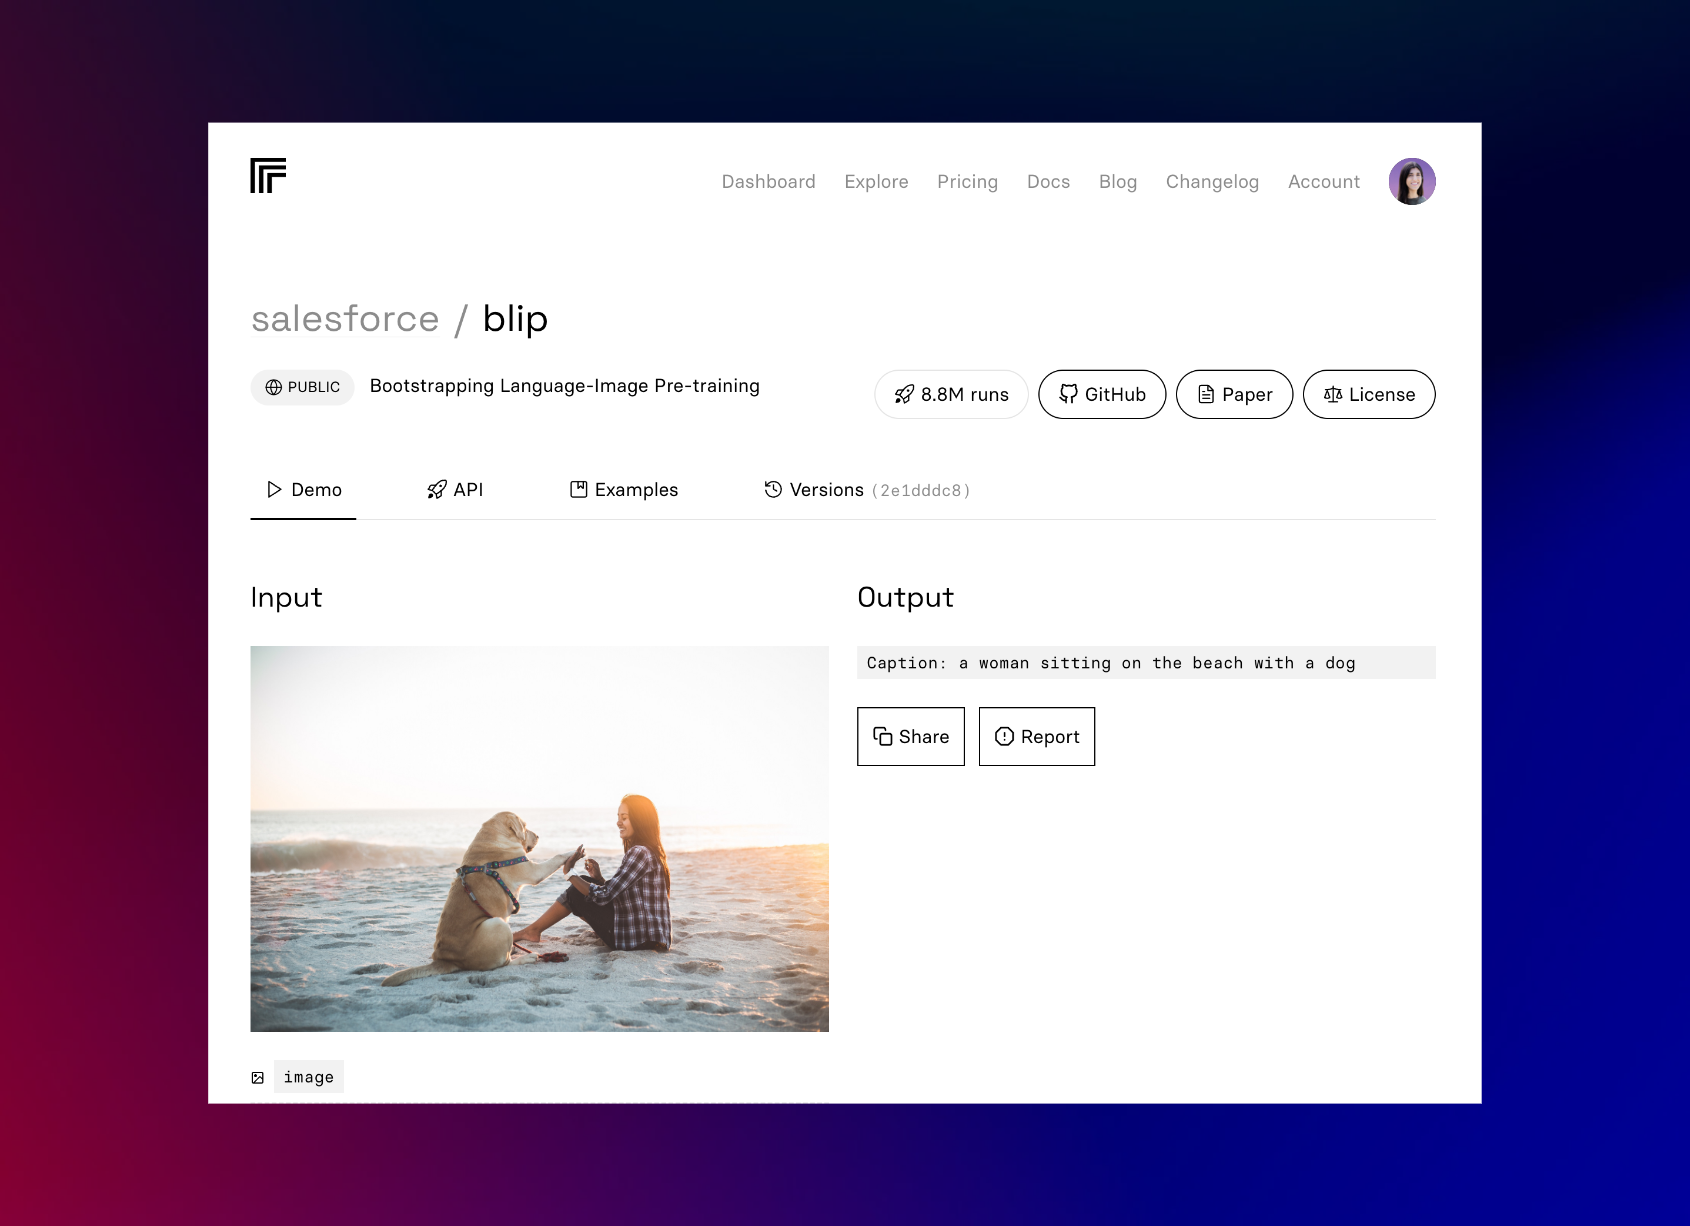
Select the API tab.
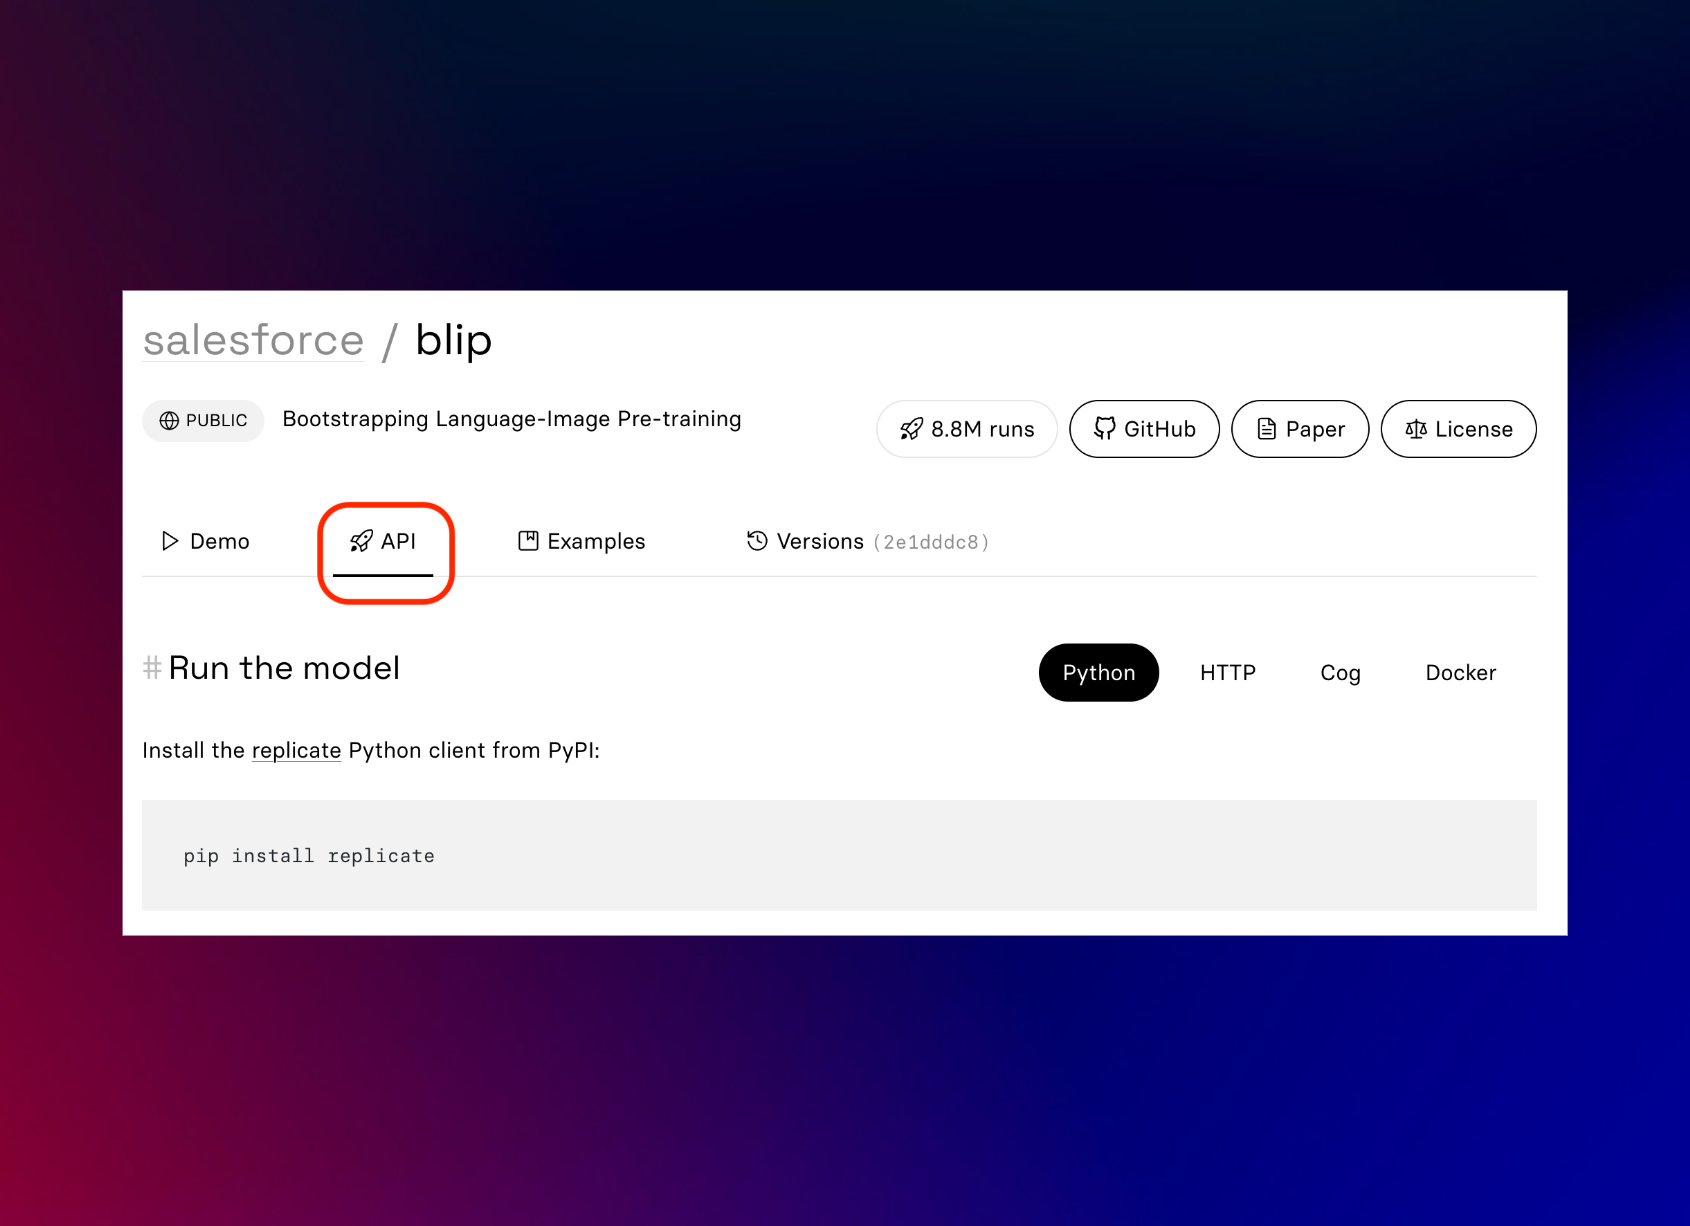
Scroll down until the version number shows up, outlined in red.
And outlined in blue are the input parameters you can use.
// `/pages/api/generate.ts` continued

  let jsonStartResponse = await startResponse.json();
  let endpointUrl = jsonStartResponse.urls.get;

  // GET request to get the status of the image restoration process & return the result when it's ready
  let caption: string | null = null;
  while (!caption) {
    // Loop in 1s intervals until the alt text is ready
    console.log("polling for result...");
    let finalResponse = await fetch(endpointUrl, {
      method: "GET",
      headers: {
        "Content-Type": "application/json",
        Authorization: "Token " + process.env.REPLICATE_API_KEY,
      },
    });
    let jsonFinalResponse = await finalResponse.json();

    if (jsonFinalResponse.status === "succeeded") {
      caption = jsonFinalResponse.output;
    } else if (jsonFinalResponse.status === "failed") {
      break;
    } else {
      await new Promise((resolve) => setTimeout(resolve, 1000));
    }
  }
  res.status(200).json(caption ? caption : "Failed to generate caption");
}
Next, a while loop is used to poll the endpointUrl in 1-second intervals until the caption is ready. The loop sends a GET request to the endpointUrl with the same Authorization and Content-Type headers, and the response is also parsed as JSON. If the status in the jsonFinalResponse object is "succeeded", the caption is extracted from the output property. If the status is "failed", the loop is terminated. If the status is neither "succeeded" nor "failed", the loop waits for 1 second using the setTimeout method before polling again.
Finally, the caption is returned as a JSON response with a status code of 200 if it's not null, otherwise, a response with the message "Failed to generate caption" is returned with a status code of 200.
Conclusion
In conclusion, this project has provided valuable experience in implementing image uploading, rate limiting and integrating machine learning APIs. By successfully completing this project, we have gained a better understanding of these technologies and how they can be utilized to create more advanced projects in the future.
